October 01, 2012

Make your own multi-personality fortune teller

 For something to scare people or give them a fright during Halloween, consider getting started on this fortune-telling machine. Based around an Arduino board and a .wav file playback shield, a coin acceptor you can find on eBay, a skull and a lot of hardware - you can make a fortune teller with an adjustable personality. The curious customer sets the level of 'evil' using a knob then inserts a coin for the spooky message - for example:


Si if you enjoy Halloween or looking to make a fortune-telling machine, this is a good start. And for more, we're on twitter and Google+, so follow us for news and product updates as well.


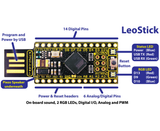
When making your own fortune teller or other project, increase reliability and project lifespan by using a protoshield instead. In doing so, consider our range of ProtoShields. From the tiny LeoStick to the Mega range, we offer a complete range for you to work with.


October 01, 2012

Using a LeoStick to control garden watering systems

 Brendon Poole inherited a defunct garden watering system with the purchase of a new home, and decided to bring it back to life (the watering system, not the house). Although a work in progress, he has successfully created the menu control system and a real-time clock by using the Menu library and various resources.


We look forward to following Brendon's project and the eventual goal of controlling the sprinkler system. For more information, visit his blog here. And for more, we're on twitter and Google+, so follow us for news and product updates as well.


So what is a LeoStick? It's the Arduino Leonardo-compatible board that's cheaper and smaller than the original:


 Apart from being one of the smallest Arduino-compatibles on the market with USB, it also has an onboard RGB LED and piezo which can be used a knock sensor and various tune and sound effects. Plus you can add extra circuitry with the matching protostick! For more information and to order, click here.


September 28, 2012

Control window blinds with Arduino and the web

 Using an Ethernet-enabled Arduino board, motor shield, a stepper motor or two and miscellaneous hardware, Instructables user 'freedomtocreate' has created a system that can open and close window blinds by a variety of methods. Apart from controlling them via a web interface - which also allows programming parameters such as opening and closing times, it can also be programmed to react to temperature and light levels. Below is the layout of the prototype before installation:


Some extra logic may need to be incorporated, for example how would you like the blinds if it's bright and cold? Nevertheless it's a great tutorial and the base for some imaginative work. And for more, we're on twitter and Google+, so follow us for news and product updates as well.


When putting together your next Internet-enabled Arduino project - save time, space and money with the Freetronics EtherTen. Apart from being fully Arduino Uno-compatible, it has onboard Ethernet, microSD socket, full USB interface (so you don't need a costly FTDI cable just to upload a sketch!) and supports optional Power-over-Ethernet.


September 28, 2012

Experimenting with Arduino and RS485 data communication

 After some curiosity about RS232 serial communications, Guillaume Dallaire investigated further and started experimenting with RS485. This standard allows more than one device to communicate with a host (such as an Arduino) such as sensors or display devices. That is in fact what Guillaume has demonstrated, and apart from demonstrating the required hardware and RS485 interface ICs he also offers simple code to demonstrate the system. 


You can see how simple it is to implement RS485, and one of the main reasons to use it is you can have a distance of over one hundred meters between devices - much longer than SPI or I2C. To find out more, check out his project page. And for more, we're on twitter and Google+, so follow us for news and product updates as well.


So if this sort of project intrigues you and you're new to Arduino, the first step is a solid board for your projects - our Freetronics Eleven - the Arduino-Uno compatible with low-profile USB socket, onboard prototyping space and easy to view LEDs:


September 28, 2012

DIY PC Network Status with Arduino

 Tasked with monitoring over a dozen PCs in a laboratory setting, Physics professor 'Dr Ayers' has created a complex monitoring device with a very simple and informative display. By using red/green LEDs each PCs status can be determined at a glance. The monitor's host computer runs a cron job once per minute to check the network PCs, and the status for each PC is shown with an LED (red = problem, green = OK, yellow = no idea). Finally the whole lot fits in a standard 5.25" drive bay, for example:


A very 1960s display for a 21st century problem. For the required code and notes, check out the project page. And for more, we're on twitter and Google+, so follow us for news and product updates as well.


If you're looking to make your own status indicator but need more than three colours -  consider the Freetronics RGBLED: module. It includes a bright RGB LED on the top of the board and a WS2801 constant-current, addressable, multi-channel LED driver on the back. This smart module can be daisy-chained, so you can connect a number of these together in a string and drive each of the module colours individually from your microcontroller. For more information and to order, visit the product page.

September 27, 2012

Different Multi-line LED matrix display from an old printer

 As part of their efforts for a Belgian "Arduino jam", Instructables user 'jekkos' created a completely different kind of LED matrix display using the remnants of an old inkjet printer. The display also operates in a similar fashion to it's roots - by moving an 8x8 LED matrix one character at a time and displaying each character in turn. A perfect subject for time-lapse photography. Furthermore the whole thing has been interface with a Raspberry Pi to make text entry simple. You can see it in action in the following video:


Certainly a different yet an interesting exercise. For a complete breakdown click here. And for more, we're on twitter and Google+, so follow us for news and product updates as well.


If you're an experienced Arduino user and interested in more advanced Arduino projects and usage - get yourself a copy of "Practical Arduino" by Jonathan Oxer and Hugh Blemings:


Create your own Arduino-based designs, gain an in-depth knowledge of the architecture of Arduino, and learn the easy-to-use Arduino language all in the context of practical projects that you can build yourself at home. Get hands-on experience using a variety of projects and recipes for everything from home automation to test equipment. For more information and to order, click here


September 27, 2012

Arduino-controlled Optical Theremin

 For those wanting a simple and interesting project to introduce someone to the world of Arduino - this could be the ticket. Instructables user 'gwarbeh' has created a theremin (a musical instrument that is played without physical contact) using a light-sensor, Arduino and headphones for audio output. You can make it in less than half an hour, and the results are quite good - for example: 


For all the details and Arduino sketch visit the project pageAnd for more, we're on twitter and Google+, so follow us for news and product updates as well.


Looking for a light sensor? Although it can be tempting to use a light-dependent resistor, they're fragile and can give varying results. Instead - consider our LIGHT: light sensor module based around the digital TEMT6000 sensor. It gives consistent and reliable readings, and is incredibly easy to use with our Getting Started guide. For more information and to order, click here!


September 27, 2012

Remote temperature monitoring with Arduino and GSM

 After the hot water system and heat failed in his holiday house, Matt Tilchen needed a way to check that on the new hot water system regularly without having to physically visit the house. Although sending sensor data via the Internet sounded promising, that would incur an unwanted expense of a connection just for some data. Instead he used an Arduino combined with a DS18B20 temperature sensor and a GSM Arduino shield. On a regular basis the Arduino would send the temperature data via SMS to Matt's phone - or if a sudden change in temperature occurs it would SMS immediately. And if it didn't send a message after a period of time - he also knew there would be a problem. Anything to avoid a repeat of the damage shown below:


For details on how the system works and to recreate your own, click here. And for more, we're on twitter and Google+, so follow us for news and product updates as well.

To get started with your own temperature-controlled projects, consider using our TEMP: DS18B20-based temperature sensor module:


... or our HUMID: Humidity and Temperature sensor module based on the popular DHT22 sensor unit. Both modules are fully documented and easy to get started with. These are only two of over a dozen of our sensor and outputs modules available now from Freetronics!


September 27, 2012

DIY Wireless Motion Sensor Array

 Matthew over at the code|hack|create site needed to be aware of movement in many places at once, in order to detect the arrival of the courier and movement in other areas of his building. Although placing passive infrared sensors around and wiring them back to a main unit sounds simple, in reality all that wiring is inconvenient and a mess. Therefore Matthew instead connected each PIR to an Arduino and an inexpensive wireless data transmitter. At the receiving end another Arduino to a matched receiver which can then take action once motion in any of the areas has been detected.


For more information about this project, click here. And for more, we're on twitter and Google+, so follow us for news and product updates as well.


If you're interested in using wireless data links with your Arduino project, we have two convenient receiver shields - both 315 MHz and 433 Mhz. Combined with the Getting Started guide you'll be up and going in no time. For more information check out the product page


September 25, 2012

Make your own quasi-realtime oscilloscope with Arduino

 Over at the coolarduino blog they have been working on a variety of analogue-digital (and vice-versa) projects that interface with various Arduino boards. One of these which caught my attention is their quasi-oscilloscope. By using an Arduino Leonardo (or compatible) you can recreate their four-channel quasi-scope. The external circuitry required in this version has been reduced due to the programmable gain amplifier in the board's ATmega32U4 microcontroller. The display is certainly unique - using the serial monitor - for example:


Certainly an interesting example of home-brew test equipment. For more information and plans visit the project page here. And for more, we're on twitter and Google+, so follow us for news and product updates as well.

Looking to recreate this project, or need an Arduino Leonardo-compatible board that's cheaper and smaller than the original? Then consider the Freetronics LeoStick:


 Apart from being one of the smallest Arduino-compatibles on the market with USB, it also has an onboard RGB LED and piezo which can be used a knock sensor and various tune and sound effects. Plus you can add extra circuitry with the matching protostick! For more information and to order, click here.