September 11, 2012

Tutorial: Using Atmel Studio 6 with Arduino projects

 The team at the engblaze blog have put together an easy to follow tutorial on how to work with Atmel Studio 6 and our Arduino projects. But why would you want to do this? Although the Arduino IDE makes life very simple, it hides a lot of debugging information and hides a lot of debugging tools. Furthermore, by learning to use Atmel Studio you can gain experience with a more complex IDE that you will need after changing development platforms to raw AVR. The tutorial takes  you through all stages, including the compiler, linker and flashing the board with the compiled code. 


To get started click here for the tutorial. And we're on twitter and Google+, so follow us for news and product updates as well.

If you're interested in more advanced Arduino projects and usage - get yourself a copy of "Practical Arduino" by Jonathan Oxer and Hugh Blemings:


Create your own Arduino-based designs, gain an in-depth knowledge of the architecture of Arduino, and learn the easy-to-use Arduino language all in the context of practical projects that you can build yourself at home. Get hands-on experience using a variety of projects and recipes for everything from home automation to test equipment. For more information and to order, click here


September 11, 2012

Make your own netduino EEPROM shield

 There are many development platforms whose boards mimic the profile and design used with our Arduino protoshields, and one of them is the netduino system. One example of this is Dave Van Wagner's netduino EEPROM shield. He has created this so his system can store data without losing it after a reset or power off situation. Dave used Microchip 25AA1024 EEPROMs which operate over the SPI bus - and therefore this could work with an Arduino as well. Finally he has fitted a series of jumpers so the user can physically select the SPI bus' chip-select pin. Great idea Dave!


A handy shield to have that transcends platforms. For more information and notes, visit Dave's page here. And we're on twitter and Google+ - so follow us for news and product updates as well. 


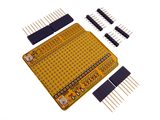
If you have an Arduino, netduino, olimexduino, or any one of the myriad of boards out there - we have a prototyping shield for you. From our tiny Leostick, to the Uno/Eleven and Mega-shields - we've got you covered. Check out our range today

September 10, 2012

DIY Ping-Pong ball launcher with Arduino

 If you're looking for something fun to make and to annoy others with, consider making your own ping-pong ball launcher. Enthusiast Franciso Dias has described his own version to almost infinite detail, including publishing all the files required to make the launcher parts with a 3D printer and the base with a CNC or laser-cutting machine. The balls are propelled by two counter-rotating wheels, and the angle of launch is controlled via servos. Here it is with a quick launching:


With some scaling of dimensions you could also create a launcher for larger or smaller balls, such as baseballs or cricket balls. Nevertheless for the complete details click hereAnd we're on twitter and Google+ - so follow us for news and product updates as well. 

If  this sort of project intrigues you and you're new to Arduino, the first step is a solid board for your projects - our Freetronics Eleven - the Arduino-Uno compatible with low-profile USB socket, onboard prototyping space and easy to view LEDs:


September 10, 2012

Tutorial: Basics of MIDI and Arduino

 You may have heard or read about the term MIDI many times over the years, and known it had something to do with controlling electronics music devices via a computer or some sort of controller. However the actual nuts and bolts of how it works may have remained a mystery. Until now! Amanda Ghassaei has published another great tutorial on how to send and receive MIDI signals via an Arduino board. Not only does she explain the required circuitry and Arduino sketches, Amanda also explains the MIDI protocol itself. Finally, various demonstrations are provided to help you get moving with MIDI for example:


So for more fun and information, visit the tutorial to get started. And we're on twitter and Google+ - so follow us for news and product updates as well. 


When making your own MIDI-interfaces, you'll need a protoshield to mount the external circuitry. In doing so, consider our range of ProtoShields. From the tiny LeoStick to the Mega range, we offer a complete range for you to work with.


September 10, 2012

Convert a dial phone into a cordless with Arduino

 Old dial phones never die - they just get hacked! And in this case in a very useful manner. Arduino enthusiast Andrew F has modified a typical rotary dial phone by using an Arduino board to decode the signals from the dial. Once a telephone number has been dialled, the Arduino 'presses' the buttons from a cordless telephone handset PCB hidden inside the rotary phone. The Arduino's digital outputs are connected to the cordless PCB via optocouplers, and with it also monitoring the hook switch, can then dial the number to call and press 'send' just like a person. Once the handset is replaced, the call is ended. 


What a great modification - to get started visit the project page here. And we're on twitter and Google+ - so follow us for news and product updates as well. 

If you're thinking of embedding an Arduino-compatible board in your next project or rotary phone, consider using the Freetronics LeoStick:


 Apart from being one of the smallest Arduino-compatibles on the market with USB, it also has an onboard RGB LED and piezo which can be used a knock sensor and various tune and sound effects. Plus you can add extra circuitry with the matching protostick! For more information and to order, click here.


September 10, 2012

View your Arduino sketch as assembly code

 Arduino enthusiast Duane at the rcarduino blog has documented some fascinating insights into how the Arduino IDE converts our sketches into the raw assembly code that is executed by the microcontroller. Why would you want to do this? Some Arduino instructions may be similar in size within your sketch, however one may require many more instructions than the other when converted to assembly. Duane's prime example of this is a++ and b++ - if a is a global integer, the compiler could generate up to six times more code to deal with it than if it was a local variable.


So after analysing your code in more detail, you can find bloated parts of code and consider how to simplify them. The main benefits of doing so will be increasing the speed of operating, and reducing the total memory required. For a complete tutorial on how to extract the assembly code click here. Plus we're on twitter and Google+ - so follow us for news and product updates as well. 

When your projects outgrow the normal Arduino-compatible boards, running out of program and flash memory space, or you're stacking on Ethernet and microSD shields, or all at once - it's time to upgrade to the Freetronics EtherMega:


Quite simple the EtherMega is the fully-loaded Arduino-compatible board on the market today. Apart from being completely Arduino Mega2560-compatible, it includes full Ethernet interface, a microSD card socket, full USB interface, optional Power-over-Ethernet support and still has a circuit prototyping area with extra I2C interface pins. So if your project is breaking the limits, upgrade to the EtherMega today. 


September 10, 2012

Experimenting with Arduino and measuring battery capacity

Savvy shopper Denis Hennessy was curious about the individual capacity of various AA cells after realising that unlike other products in the supermarket, there is no tangible way to compare capacities before purchase. That is - we can see units per dollar for foodstuffs (etc) but not mAh per dollar for disposable batteries. Therefore Denis created a battery discharger based on an Arduino board. It works by simply discharging the cell under test using a bank of resistors as a load, and measures the voltage using the Arduino's analogue input. The required data is displayed on an LCD and also sent to a PC for logging and analysis. 


Although not a perfect analysis tool - it does provide interesting results for the various brands of batteries. For more information and design plans, visit Denis' site. Plus we're on twitter and Google+ - so follow us for news and product updates as well. 

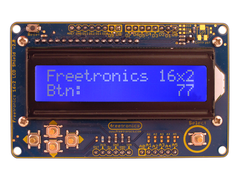
When making your own battery tester or other Arduino-based project that needs an LCD display - consider the Freetronics LCD & Keypad shield - which contains a bright 16x2 character LCD and five buttons that can be read from only one analog input pin:


September 07, 2012

DIY Touch-control Tic Tac Toe

 Over time there have been many implementations of the "noughts and crosses"/"tic tac toe" game with various forms of technology. One fascinating version has been created by Instructables user 'origamiwolf' who has used a home-made touch-sensitive panel as the user interface. This results with a game that is controlled in a more natural method by simply touching the board positions. Driven by an Arduino board, the project is simple and also introduces several good concepts with regards to programming, including multiplexing and bitwise arithmetic - so you may learn something as well. To get started, here is the game in action:


... and for the rest visit the project page. Plus we're on twitter and Google+, so follow us for news and product updates as well. 

If you're interested in Arduino-controlled touch screens and looking for guidance and information on other interesting Arduino projects - get yourself a copy of "Practical Arduino" by Jonathan Oxer and Hugh Blemings:


Create your own Arduino-based designs, gain an in-depth knowledge of the architecture of Arduino, and learn the easy-to-use Arduino language all in the context of practical projects that you can build yourself at home. Get hands-on experience using a variety of projects and recipes for everything from home automation to test equipment. For more information and to order, click here


September 07, 2012

Catarina's Paper Piano Box

 Open source practice researcher Catarina Mota and Will Byrd have created a special take on a piano using an Arduino Mega board - their Paper Piano Box. It is a piano with twelve keys, with the keyboard fashioned out of cardboard and copper tape - each key is a capacitive sensor read by the Arduino. Tones are generated with the Arduino tone library and up to five tones can be played simultaneously. Furthermore a visual rendition of the music is displayed using LEDs and light tubes. For more information, review the following video:


Catarina has made the Arduino sketch and notes available here. And we're on twitter and Google+, so follow us for news and product updates as well. 

When your projects outgrow the normal Arduino-compatible boards, running out of program and flash memory space, or you're stacking on Ethernet and microSD shields, or all at once - it's time to upgrade to the Freetronics EtherMega:


Quite simple the EtherMega is the fully-loaded Arduino-compatible board on the market today. Apart from being completely Arduino Mega2560-compatible, it includes full Ethernet interface, a microSD card socket, full USB interface, optional Power-over-Ethernet support and still has a circuit prototyping area with extra I2C interface pins. So if your project is breaking the limits, upgrade to the EtherMega today. 

September 07, 2012

"Compy Sketch" - bringing Etch-A-Sketch into the 21st century

 Engineer Alan Argondizza has recreated the popular Etch-a-Sketch childrens' toy and made it much more user-friendly by way of an Arduino board, external circuitry and a PC. Instead of controlling an original board, or making their own - his "Compy Sketch" has knobs which are read by an Arduino wihch sends the commands off to the PC. The resulting works of art are then displayed on a custom piece of software that Alan has developed and made available for three main platforms. You can even save your work for later review - something the original could never do...


For more information on the Compy Sketch visit Alan's page. And we're on twitter and Google+, so follow us for news and product updates as well. 

Thinking of embedding an Arduino-compatible board in your next project? Consider using the Freetronics LeoStick:


 Apart from being one of the smallest Arduino-compatibles on the market with USB, it also has an onboard RGB LED and piezo which can be used a knock sensor and various tune and sound effects. Plus you can add extra circuitry with the matching protostick! For more information and to order, click here.