September 18, 2012

Hacking IKEA LED Strips with Freetronics Leostick

 Technologist Peter Hardy has once again turned to the Arduino world to control something interesting. In this version he controls some IKEA "Dioder" RGB LED strips with our own LeoStick board. The designers made this almost too easy, as it was a simple job to crack open the control box and connect the LeoStick digital outputs to the three MOSFETS - one for each colour of LED. From then on anything is possible due to the possibilities of Arduino programming.


The hardest part of this project would be navigating through IKEA on the weekend to buy the lights. For more information and code, check out Peter's blog. And we're on twitter and Google+, so follow us for news and product updates as well.


If you're looking to make your own projects that could use different light effects and don't fancy a trip to IKEA, consider the Freetronics RGBLED: module. It includes a bright RGB LED on the top of the board and a WS2801 constant-current, addressable, multi-channel LED driver on the back. This smart module can be daisy-chained, so you can connect a number of these together in a string and drive each of the module colours individually from your microcontroller. For more information and to order, visit the product page.

September 18, 2012

Make your own Arduino-controlled robotic drum kit

 Instructables staff member Randy Sarafan has documented one of the largest Arduino-based projects we have seen for some time, his Robot Drum Kit. It isn't a bunch of robots playing the drums, instead each drum is played by an Arduino with two drumsticks controlled by car door lock motors and motor shields. Making the system play is a sequencing program for MAX MSP which controls the Arduinos via USB. The entire project is simply amazing and worth a look here:


For complete instructions, check out the project page. And we're on twitter and Google+, so follow us for news and product updates as well.

If you're interested in more advanced Arduino projects and usage - get yourself a copy of "Practical Arduino" by Jonathan Oxer and Hugh Blemings:


Create your own Arduino-based designs, gain an in-depth knowledge of the architecture of Arduino, and learn the easy-to-use Arduino language all in the context of practical projects that you can build yourself at home. Get hands-on experience using a variety of projects and recipes for everything from home automation to test equipment. For more information and to order, click here


September 18, 2012

Simple Arduino DAC using internal pull-up resistors

 Next in our series of creating your own digital-to-analogue converters comes a simple yet somewhat genius idea from Arduino forum member 'raalst'. With the knowledge of how an R/2R resistor ladder works to create reasonable analogue output, he has used a clever way of harnessing the internal pull-up resistors inside the microcontroller to act as part of the ladder, thereby minimising the external parts required. However as they internal resistors can vary in value, a bit of testing is required to find ones that are close to equal. From that point some bitwise arithmetic to control the ports and an external resistor leaves you with a basic DAC, for example:


Note that the output signal will be quite weak, and requires amplification - a simple op-amp circuit would suffice. For more information and discussion about this method, visit the Arduino forum. And we're on twitter and Google+, so follow us for news and product updates as well.


When making your own DAC, you'll need a protoshield to mount the external circuitry. In doing so, consider our range of ProtoShields. From the tiny LeoStick to the Mega range, we offer a complete range for you to work with.

September 18, 2012

Make your own payment system with a coin acceptor and Arduino

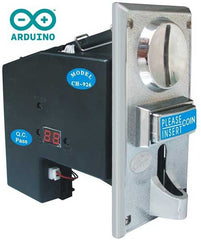
 Instructables user 'skipped' has documented something quite different - how to read the data from a coin acceptor. Apparently these are cheaply available on eBay, which opens up all sorts of possibilities: vending machines, over-engineered money boxes, pay toilets and more. Apart from documenting how the coin acceptors can be programmed to measure and report on various coin sizes, he has described how to use this data using an Arduino and also via PC with MS Express 2010. 


Fascinating stuff, and possibly useful in the right situation. To get started visit the project pageAnd we're on twitter and Google+, so follow us for news and product updates as well.

To minimise the space required for such a project, a Freetronics LeoStick would fit snugly under the coin acceptor:


 Apart from being one of the smallest Arduino-compatibles on the market with USB, it also has an onboard RGB LED and piezo which can be used a knock sensor and various tune and sound effects. Plus you can add extra circuitry with the matching protostick! For more information and to order, click here.


September 18, 2012

Convert a mouse into a robot odometer with Arduino

 In order to determine the distance a robot travels, John Graham-Cumming found inspiration right on the desktop - and converted an old optical mouse sensor into a simple and usable odometer. After hacking out the sensor part of the PCB, he ran the signals from the mouse through a logic analyser to determine how the mouse reported back to a PC. With this knowledge he then wrote some Arduino code to clock the mouse and retrieve the data - making use very easy. 


The only consideration is the surface must be similar to that when using an optical mouse, otherwise the sensor will misread. Nevertheless, to get started visit John's project page here. And we're on twitter and Google+, so follow us for news and product updates as well.

So if this sort of project intrigues you and you're new to Arduino, the first step is a solid board for your projects - our Freetronics Eleven - the Arduino-Uno compatible with low-profile USB socket, onboard prototyping space and easy to view LEDs:


September 17, 2012

Using the Arduino IDE on Raspberry Pi

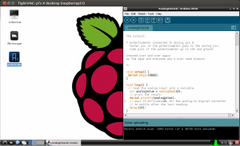
 For those of you enjoying your Raspberry Pi so much that you'd like to use it as the host PC for your Arduino projects - a simple project by Michael on the mitchtech blog is the answer. He runs through the procedure to download and install the Arduino IDE, and also notes that you need to power the Arduino board externally as the power circuitry in the Raspberry Pi cannot support itself and an Arduino board simultaneously. 


For more information, and some other interesting tutorials head over to the mitchtech blog. And we're on twitter and Google+, so follow us for news and product updates as well.

If you're looking to get more out of your Arduino projects, but find the normal Uno-style boards limiting - check out the Freetronics EtherMega:


Quite simple the EtherMega is the fully-loaded Arduino-compatible board on the market today. Apart from being completely Arduino Mega2560-compatible, it includes full Ethernet interface, a microSD card socket, full USB interface, optional Power-over-Ethernet support and still has a circuit prototyping area with extra I2C interface pins. So if your project is breaking the limits, upgrade to the EtherMega today. 

September 17, 2012

Hijack IR remote-control signals for fun and mischief

 Now for something completely different - an infra-red remote control hijacker. By using an Arduino of almost any type, a 38 kHz IR receiver and a matching infra-red transmitter LED a lot of fun can be had. How? Simple - when the Arduino receives an command from any infra-red remote control - it transmits a random command to the units to be controlled. So if someone (for example) tries to change the TV channel, the volume might drop or some other random function be activated. Perfect for annoying people as a practical joke. 


However be careful, you don't want to be caught out. So hide your hijacker well! To get started, click here. And we're on twitter and Google+, so follow us for news and product updates as well.

If you need to hide your Arduino board - size is important. And one of the smallest complete boards out there is the Freetronics LeoStick:


 Apart from being one of the smallest Arduino-compatibles on the market with USB, it also has an onboard RGB LED and piezo which can be used a knock sensor and various tune and sound effects. Plus you can add extra circuitry with the matching protostick! For more information and to order, click here.


September 17, 2012

Digital to analogue conversion with resistor ladders and Arduino

 Although many users may consider pulse-width modulation a form of analogue output with their Arduino (and when controlling the brightness of an LED it is a simple solution), it is not DAC at all. However even though we don't have one as standard with our Arduino boards, a form of DAC can be created with a little time by making our own with what is called the "R/2R" resistor network. This allows you to create a voltage output that is relative to a number on the Arduino. In summary, it consists of eight resistors each connected to a digital output, which are then meshed in with another eight resistors, for example:


This type of circuit can be useful to create forms of audio or other variable signal outputs. To learn more about digital to analogue conversion, and making your own using an Arduino - visit this useful tutorial by Ikalogic. And we're on twitter and Google+, so follow us for news and product updates as well.


When making your own DAC, you'll need a protoshield to mount the external circuitry. In doing so, consider our range of ProtoShields. From the tiny LeoStick to the Mega range, we offer a complete range for you to work with.


September 17, 2012

The Naked Espresso and Arduino

 In an effort to show how wonderful their coffee machines are, Breville hacked one of their more expensive double-boiler units with a variety of sensors to measure temperature, boiler pressure and flow rate through the machine. These paramaters were then captured via an Arduino board and sent to a PC to be displayed using processing. Furthermore, the data was also used as seed to create visualisations that were printed out and used as a surround for the coffee it was a product of. Although it's a bit of spin, the ability to do so is quite interesting and possibly unheard of before. The process is demonstrated in the first part of the following video:


For more information about this check out the project page. And we're on twitter and Google+, so follow us for news and product updates as well.

When experimenting with various items and an Arduino, it can be difficult and time consuming to mess about connecting wires of various sizes to the board. As you can see the coffee machine hacker has chosen our Freetronics Terminal Shield for Arduino - which neatly solved the problem:


Apart from having a larger than normal prototyping area, there are terminal blocks for every Arduino pin, three LEDs for general use and a reset button on the shield. Great for experimenting and fast I/O connections - so order yours today


September 17, 2012

Control a pet feeder via twitter and Arduino

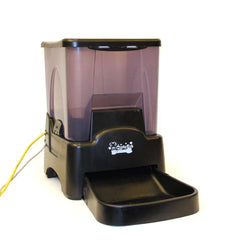
 For those of you who need to remotely control how much food is available to your pets - or perhaps remotely control a candy dispenser for humans, this project will be of interest. Created by Instructables team member Amanda Ghassaei, it's quite easy to replicate and can be applied to other devices. By breaking open the control panel for a typical cat feeder, Amanda has added some circuitry to control the buttons on the feeder that are pressed to dispense food. Note that this could be simplified with optocouplers... nevertheless, an Ethernet-enabled Arduino monitors a twitter feed and once the magic words are received, it tells the feed to dispense and then waits four hours to avoid over-feeding. 


Even if you're not wanting to control a pet feeder - the same method can be used to control an Arduino board remotely via twitter, so there's something in it for all of us. For more information head over to Amanda's page. And we're on twitter and Google+, so follow us for news and product updates as well.

Need an Ethernet-enabled Arduino board? Forget the rest - and get the outstanding Freetronics EtherTen. Apart from being fully Arduino Uno-compatible, it has onboard Ethernet, microSD socket, full USB interface (so you don't need a costly FTDI cable just to upload a sketch!) and supports optional Power-over-Ethernet:


For more information and to order, visit the product page