Fans of the "Super Mario Bros" Nintendo game franchise will love the following project. By constructing a larger-than-life piranha from styrofoam, pipe, cloth and other crafty object, Instructables user 'Anirbas91' has completed a worthwhile decoration on its' own. However with the addition of a movement sensor, and a variety of LEDs the piranha can blink randomly (or however you like) once someone moves past.

So to make your own, click here to get started. And for more, we're on twitter and Google+, so follow us for news and product updates as well.

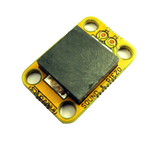
If you're looking to make your own projects that could use different light effects, consider one or more of the Freetronics RGBLED: module. It includes a bright RGB LED on the top of the board and a WS2801 constant-current, addressable, multi-channel LED driver on the back. This smart module can be daisy-chained, so you can connect a number of these together in a string and drive each of the module colours individually from your microcontroller. For more information and to order, visit the product page.