October 19, 2012

Networked Temperature Monitor for Home brewing

 A home brewing enthusiast had a problem with one of their fridges in a seldom-visited room, and after some trial and error has created a detailed and useful networked temperature monitor. It's based around a Freetronics EtherMega, a lot of DS18B20 temperature sensors and a TFT colour touch screen. Using this setup you can display up to twelve temperatures at once - a great use of the 1-wire interface and an Arduino. And the results are quite professional, for example:


For more information, click here for sketches, notes and other home-brewing topics. And for more, we're on twitter and Google+, so follow us for news and product updates as well.

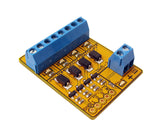
To get started with your own temperature-controlled projects, consider using our TEMP: DS18B20-based temperature sensor module:


... or our HUMID: Humidity and Temperature sensor module based on the popular DHT22 sensor unit. Both modules are fully documented and easy to get started with. These are only two of over a dozen of our sensor and outputs modules


October 18, 2012

Guino: PC Dashboard for your Arduino

 Mads Hobye has created a great piece of software that allows one to create a software "dashboard" for your Arduino. The purpose of this to make life much simpler when debugging and running Arduino sketches, by allowing you to visualise realtime data and Arduino status. In other words, it's a graphical user interface for your Arduino. See it in action during the following video:


This would have many uses, and certainly be very handy when debugging hardware sensors and so on. To get started, visit Mads' project page. And for more, we're on twitter and Google+, so follow us for news and product updates as well.


Although the PC dashboard is super-convenient, you may need to test in the field or away from a computer. In these cases consider using the Freetronics LCD & Keypad shield to display your data. It contains a bright 16x2 character LCD and five buttons that can be read from only one analog input pin:


October 17, 2012

Make your own laser "sleep remaining" clock

 When you wake up in the early hours of the morning and wan to know how much more sleep you can get in - however have trouble focusing on the clock, this may be the project for you. Niravel Patel has created an interesting method of display how many hours are left in a user-set period by shining a laser pointer between vertical and horizontal. The device has a potentiometer which is set to a certain number of hours, and during that period of time the laser is rotated by a servo at a constant rate until the beam is horizontal - at which time your sleep is (theoretically) over. For example:


What a great idea. To get started, visit the project pageAnd for more, we're on twitter and Google+, so follow us for news and product updates as well.

If projects like this interest you, however you're not sure about using servos or Arduino in general - don't panic! Check out our new Experimenter's Kit for Arduino:


The package includes a wide variety of parts, sensors and modules including: a servo motor, lights, buttons, switches, sound, sensors, breadboard, wires and more. Furthermore a Freetronics Eleven Arduino-compatible board is included to make this an extensive hobby experimenter, inventor and starter kit. However we don't leave you alone to figure it all out, included is a great project and instruction booklet, plus access to a supporting web page and software examples. In other words - this is everything you need to get started for a fun range of electronics and Arduino related projects! 

So to get started or for more information and to order, check out the product page.


October 17, 2012

Control a Nintendo Gameboy printer with Arduino

 If you happen to pass by an old Nintendo Gameboy printer (something I didn't know even existed until today) - you can interface it with your Arduino-compatible boards very easily. Using a collation of instructions and example sketches by Miles Burton, text and images can be printed with relative ease. It turns out the printer has a relatively simple serial interface, and perfect for inexpensive hard copy. 


For more information, including a description of the serial protocol used, example Arduino sketch and other notes, visit Miles' project page.  Or if you're interested in backing up Gameboy cartridge data, click here. And for more, we're on twitter and Google+, so follow us for news and product updates as well.

If this sort of project intrigues you and you're new to Arduino, the first step is a solid board for your projects - our Freetronics Eleven - the Arduino-Uno compatible with low-profile USB socket, onboard prototyping space and easy to view LEDs:


October 17, 2012

DIY Keypad Access System with Arduino

 Another random example of what can be done quite easily with an Arduino-based system is a security access system. A popular method is using a numeric keypad, and this is how Instructables user "camilo.n1012" has created theirs. The goal of the system is to activate a device upon entry of the correct PIN using the keypad, and in this example a servo is controlled. You could always replace this with a door strike controlled by a MOSFET, or other devices controlled by relays. Here's an example of the system:


For the example hardware and Arduino sketches, click here. And for more, we're on twitter and Google+, so follow us for news and product updates as well.

Although the process described above may be simple for one relay or device, or if you have plenty of time - it can be done reasonably easily. However if you have two or more relays - it's much easier to use dedicated relay control boards. Here at Freetronics we have the RELAY4: board, perfect for controlling up to four relays with Arduino (or any other microcontroller's) digital output pins:

Or if you'd like to control up to eight relays - or more at once with an Arduino Uno orcompatible board - consider our RELAY8: board. Controlled via I2C, you can stack up to eight shields with the appropriate power supply to support 64 relays at once:


October 16, 2012

The Arduino-powered Luxcity UV Tonic Control System

 As part of the upcoming "Festival of Transitional Architecture" in Christchurch, New Zealand - the people at "Clandestine Laboratories" are working on an amazing device that is "a sequencing control system for 64 solenoids that control a mixture of UV tonic and air into a manifold of pipes to be pumped around a structure". To do this they needed to simply control all those solenoids from one point, and the perfect base for this is some Arduino-compatible hardware and eight of our RELAY8: relay control shields:


Still a work-in-progress, however the results will be fascinating. For more information and to follow the project, click here. And for more, we're on twitter and Google+, so follow us for news and product updates as well.


So what is the RELAY8:? It's a new Arduino shield that allows you to drive up to 8 relays from your Arduino using just 2 I/O pins with this shield. It communicates with your board using I2C, so you can even stack several shields together to drive 16, 24, or more outputs! Includes back-EMF protection and works with a wide range of relays. Perfect for home automation projects! For more information and to order, click here


October 16, 2012

Example: Debounce hardware buttons with interrupts

 Not preparing for button 'bouncing' is a common mistake that most beginners will come across once, and there are several methods for debouncing to allow for accurate button reading on digital input pins. A simple solution is with hardware - using a pull-down resistor and capacitor to keep the logic low (or high). However you may not have the parts, or the space in the prototype. Therefore the method described by Jordan at digitalduino will do the trick - they describe how to debounce using interrupts. By wiring a button to an interrupt pin, when activated a function runs that counts time using millis() to debounce in software. 


For more information and a detailed example sketch, click here. And for more, we're on twitter and Google+, so follow us for news and product updates as well.

It is hints and tips like debouncing that can be found in various tutorials for beginners, and if you're interested in learning about Arduino - but not too sure where to start - check out our new Experimenter's Kit for Arduino:


The package includes a wide variety of parts, sensors and modules including: a servo motor, lights, buttons, switches, sound, sensors, breadboard, wires and more. Furthermore a Freetronics Eleven Arduino-compatible board is included to make this an extensive hobby experimenter, inventor and starter kit. However we don't leave you alone to figure it all out, included is a great project and instruction booklet, plus access to a supporting web page and software examples. In other words - this is everything you need to get started for a fun range of electronics and Arduino related projects! 

So to get started or for more information and to order, check out the product page.


October 16, 2012

Run BASIC on your Arduino

 If you have a hankering to convert some really, really old software written in BASIC to run on your Arduino you may want to consider Mike's port of TinyBASIC from the 68K assembler version. Although it isn't completely featured, you can get it working and control via the serial monitor. The project has also been picked up by another enthusiast - and TinyBASICPlus was born which adds SD card and LCD support, amongst other things. 


So if you have an Arduino-compatible board, check out TinyBASICPlus. And for more, we're on twitter and Google+, so follow us for news and product updates as well.

You can take this project one step further by adding a PS/2 keyboard interface to your board for easier data input, and the instructions to do this and other fun projects are contained in the fascinating book "Practical Arduino" by Jonathan Oxer and Hugh Blemings:


Create your own Arduino-based designs, gain an in-depth knowledge of the architecture of Arduino, and learn the easy-to-use Arduino language all in the context of practical projects that you can build yourself at home. Get hands-on experience using a variety of projects and recipes for everything from home automation to test equipment. For more information and to order, click here


October 15, 2012

DIY Miniature car park access system with Arduino

 The folks over at the Arduining website must have had a lot of spare time, as they have created an automated boom system for a toy car car park. A servo operates the boom gate, and there are sensors 'under the ground' just like a real car park to detect the entry or exit of a vehicle. The system keeps track of how many cars are parked and refuses entry to newcomers when the carpark is full. This would be great for Matchbox car enthusiasts, or something to make with a youngster. Here it is in action:


Fascinating. All it needs now are some RFID readers, tags on the cars, a RTC - and you could make a little billing system for the carpark users :) To get started on your own carpark monopoly click here. And for more, we're on twitter and Google+, so follow us for news and product updates as well.


Interested in learning about Arduino - but not too sure where to start? Then the best way to learn is with out new Experimenter's Kit for Arduino:


The package includes a wide variety of parts, sensors and modules including: a servo motor, lights, buttons, switches, sound, sensors, breadboard, wires and more. Furthermore a Freetronics Eleven Arduino-compatible board is included to make this an extensive hobby experimenter, inventor and starter kit. However we don't leave you alone to figure it all out, included is a great project and instruction booklet, plus access to a supporting web page and software examples. In other words - this is everything you need to get started for a fun range of electronics and Arduino related projects! 

So to get started or for more information and to order, check out the product page.


October 15, 2012

Easy SMS messaging with Arduino and old Motorola handsets

 Jeff Murchison has described how to control a range of older, inexpensive Motorola GSM mobile phone handsets with an Arduino - and the goal of his exercise is to send SMS text messages from the phone. To do so with the handsets noted in his tutorial is very simple due to the serial interface on the phone and the plug used. Furthermore, considering you don't have to muck about with a GSM shield, power supply, antenna and so on - this is much easier. And a quick look at Internet auction sites found Motorola C261 handsets for around $50.


A simple and inexpensive solution to sending SMS from an Arduino. To find out how, click here for Jeff's pages. And for more, we're on twitter and Google+, so follow us for news and product updates as well.


If you're looking for other ways to send messages from an Arduino, consider using the Internet with our Freetronics EtherTen. Apart from being fully Arduino Uno-compatible, it has onboard Ethernet, microSD socket, full USB interface (so you don't need a costly FTDI cable just to upload a sketch!) and supports optional Power-over-Ethernet.