November 06, 2012

An Arduino-based Bingo number generator

 "Bingo" - somewhere out there at almost any time, someone is playing Bingo. It's fun, easy to play and enjoyed by many. However choosing the numbers for the games is generally done by a little cage of balls or an expensive dedicated Bingo machine. If you'd like to update your games into the 21st century, consider making this bingo number generator by Instructables user "thegrendel". Using the barebones Arduino circuit and an LCD module the numbers are chosen at random, and noted so they're not repeated in the same game. You can see a demonstration in the following video:


Not bad at all, and it leaves the display options wide open. Click here for the details to make your own. And for more, we're on twitter and Google+, so follow us for news and product updates as well.

If you're looking to make a larger bingo number system for your club, social group or any other interested people, consider using a Freetronics Dot Matrix Display unit:
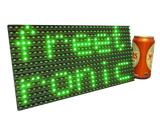


For the uninitiated, the Freetronics Dot Matrix Displays are simple to use, yet very bright for indoor and outdoor situations. Available in various colours, the 32 x 16 LED matrix can display text and graphics quite easily - and can be daisy-chained together for extended displays. For more information, see our range of Dot Matrix Displays here


November 06, 2012

DIY Solar Tracking Device with Arduino

 In order to track the sun as as the Earth rotates (or as the sun moves across the sky...) Greek technologist Costas Rooster has created a an Arduino-based device which calculates the position of the sun (in elevation and azimuth) and then positions a panel using motors and hydraulics to face the sun. It's an ideal base for solar-tracking devices and increasing the efficiency of solar panels. In the following video the entire process and result is quickly documented:


An interesting project, and all the information can be found here (opens in Google Translate). And for more, we're on twitter and Google+, so follow us for news and product updates as well.

If this type of project is of interest, you will enjoy the book  "Practical Arduino" by Jonathan Oxer and Hugh Blemings:


Using this book you can create your own Arduino-based designs, gain an in-depth knowledge of the architecture of Arduino, and learn the easy-to-use Arduino language all in the context of practical projects that you can build yourself at home. Get hands-on experience using a variety of projects and recipes for everything from home automation to test equipment. For more information and to order, click here


November 02, 2012

Polyphonic synthesiser using Freetronics LeoSticks

 Technologist Mark Jessop has created an interesting musical device using three Freetronics LeoStick boards, a computer running python and a MIDI keyboard. In effect, this allows tunes to be played through the system and the three LeoSticks act as a polyphonic synthesizer. In the following video Mark is playing the "Game of Thrones" soundtrack with great effect:


Awesome, and kudos to Mark for such an imaginative project. Find out more from his project github page. And for more, we're on twitter and Google+, so follow us for news and product updates as well.


So what is a LeoStick? It's the Arduino Leonardo-compatible board that's cheaper and smaller than the original:


 Apart from being one of the smallest Arduino-compatibles on the market with USB, it also has an onboard RGB LED and piezo which can be used a knock sensor and various tune and sound effects. Plus you can add extra circuitry with the matching protostick! For more information and to order, click here.


November 02, 2012

DIY Laser Maze game with Arduino and Processing

 In order to create something interesting for Halloween, or to recreate your own movie scenes this laser maze game fits the bill. Four laser pointer beams are used and measured by an Arduino using light sensors, and when a beam is broken an alarm or flashing light is activated. A PC running processing software monitors light levels to allow for calibration and also controls sound effects. Interestingly a servo is used to physically control a mains power outlet for a flashing light (or other noisy, high voltage devices) - perfect.


This would be a lot of fun for parties (both childrens' and adults...) so click here to get started. And for more, we're on twitter and Google+, so follow us for news and product updates as well.


When recreating your own laser mazet, consider building the external circuit on a ProtoShield - it makes your project all the more professional, and easier to enclose. We have a range of shieldsincluding basic PCBsshort versions and our ProtoShield Pro with SMD LEDs:


November 02, 2012

Web-based digital output control with Arduino

 Instructables user Claudio Vella has demonstrated how to create a nice web-based control of digital outputs using an Arduino Mega board and an Ethernet shield. If you have a fixed IP address or service this could be controlled from almost any web-based device. The code to generate the webpage is in the Arduino sketch, so the entire project can be self-contained.

Combined with a relay board such as our RELAY4: or RELAY8: you could control a huge variety of devices. The interface is neat, for example:

To get started with your own version, click here. And for more, we're on twitter and Google+, so follow us for news and product updates as well.

November 02, 2012

Make your own "Monster Box" with Arduino

 For fun over the Halloween night the people from XLC blog made a simple "Monster box" powered by an Arduino, small servo, and an infrared distance sensor. When someone or something approaches the box, the lid will open for a period of time and then close again. Once the box has been decorated as shown below it would be quite amusing for younger children:


It could be used at any time of the year, and also a fun example of an Arduino project you could share to help inspire younger people. Click here for the instructions and more demonstrations. And for more, we're on twitter and Google+, so follow us for news and product updates as well.


If this type of project interests you and you're new to the Arduino world, check out our new Experimenter's Kit for Arduino:


The package includes a wide variety of parts, sensors and modules including: a servo motor, lights, buttons, switches, sound, sensors, breadboard, wires and more. Furthermore a Freetronics Eleven Arduino-compatible board is included to make this an extensive hobby experimenter, inventor and starter kit. However we don't leave you alone to figure it all out, included is a great project and instruction booklet, plus access to a supporting web page and software examples. In other words - this is everything you need to get started for a fun range of electronics and Arduino related projects! 

So to get started or for more information and to order, check out the product page.


October 31, 2012

Visualizing distance sensor data with Arduino and Processing

 By mounting an infra-red distance sensor on an inexpensive hobby servo, measuring the distance reported by the sensor as it is rotated by the servo and feeding this to a processing sketch, enthusiast Cory Barton has created a simple radar solution using an Arduino. The distance data and also the servo motion distance is sent via serial to the host PC running processing, which then generates a visual display of the output, for example:


Simple, something different and also useful when making autonomous robots or vehicles. Click here to get started with the Arduino sketch, processing code and so on. And for more, we're on twitter and Google+, so follow us for news and product updates as well.

If you are new to Arduino, join in with our range of Arduino-compatible hardwareprototyping shields and module range. A good start is the Freetronics Eleven, the Arduino Uno-compatible board with onboard prototyping space:


October 31, 2012

DIY FM Radio Arduino shield

 Sometimes the simple things can be modified and controlled with an Arduino to enhance their use or operation. One example of this is by the "coolarduino" people who have hacked an inexpensive FM radio onto a protoshield and controlled the tuning function. The radio is based around the older Philips/NXP TDA7088 which seems to have been cloned and used in various cheap receivers. The hardware modification is quite simple and could be the base for a digital-preset FM radio control on a tight budget.


So if you see a cheap radio in the $2 shop, check it out and have some fun with it by starting hereAnd for more, we're on twitter and Google+, so follow us for news and product updates as well.

When recreating a project such as the radio shield above, consider building the external circuits on a ProtoShield - it makes your project all the more professional, and easier to enclose. We have a range of shieldsincluding basic PCBsshort versions and our ProtoShield Pro with SMD LEDs:


October 31, 2012

Control a parallel-port printer with Arduino

 You can never have too many options when interfacing with older devices that may have originally been past their "use by" date. One example of this is by Arduino forum member "sentrygun53" who has published an Arduino sketch to print text to an older printer with a Centronics parallel interface. For the younger readers, look for a printer with a socket that accepts a plug like this:


The author has successfully tested the sketch with a HP Deskjet inkjet printer, and with some experimenting should be fine with others. There is also some further discussion about using port manipulation and interfacing with other parallel devices such as flatbed scanner mechanisms. Click here for more information and discussion. And for more, we're on twitter and Google+, so follow us for news and product updates as well.

If this type of project is of interest, you will enjoy the book  "Practical Arduino" by Jonathan Oxer and Hugh Blemings:


Using this book you can create your own Arduino-based designs, gain an in-depth knowledge of the architecture of Arduino, and learn the easy-to-use Arduino language all in the context of practical projects that you can build yourself at home. Get hands-on experience using a variety of projects and recipes for everything from home automation to test equipment. For more information and to order, click here


October 30, 2012

A huge Android and Arduino-controlled robot

 Programmer Deryck Williams has created (or is still in the process of creating...) a large, ever-growing robot based on a four-wheel drive chassis. Using more than one Arduino board and several custom protoshields, his robot not only moves about but can monitor battery voltage and current draw, search out for bright light, and has a claw on a pan/tilt base. And of course there are many flashing LEDs. Interestingly the multiple Arduino boards communicate with each other via the I2C bus - thus adding a form of intelligence. 


Very well done. Visit the project page for complete details and instructions. And for more, we're on twitter and Google+, so follow us for news and product updates as well.

When recreating a project such as Deryck's mega robot, consider building the external circuits on a ProtoShield - it makes your project all the more professional, and easier to enclose. We have a range of shieldsincluding basic PCBsshort versions and our ProtoShield Pro with SMD LEDs: