Whether you want to make an electronic die, or a pair of electronic dice - the tutorial by Instructables user ".A." will give you a head-start on the project. It's a time-honoured classic Arduino project, and also a great one to share with beginners to show them how simple our technology can be. The project is constructed on an solderless breadboard an would take less than an hour to complete. Here is an example of the project in action:
So for more information and the tutorial, click here. And we're on twitter, so follow us for news and product updates as well.
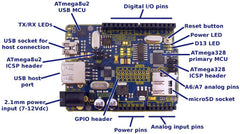
If this type of project interests you and you're new to the Arduino world, check out our new Experimenter's Kit for Arduino:

The package includes a wide variety of parts, sensors and modules including: a servo motor, lights, buttons, switches, sound, sensors, breadboard, wires and more. Furthermore a Freetronics Eleven Arduino-compatible board is included to make this an extensive hobby experimenter, inventor and starter kit. However we don't leave you alone to figure it all out, included is a great project and instruction booklet, plus access to a supporting web page and software examples. In other words - this is everything you need to get started for a fun range of electronics and Arduino related projects!
So to get started or for more information and to order, check out the product page.